This guide is intended to provide a foundation in the computational environments you will use in the Metagenomics + Microbial Surveillance VTP.
Access your Linux terminal by logging into RStudio via the web browser (can be found in the this Google Sheet: https://docs.google.com/spreadsheets/d/17YP4jSDXc1G4yKQd-zj2kZVmf1Tr6lSn5GithA84zKk/edit#gid=21277647)
Setup to your Linux environment:https://youtu.be/vVwmF4HTT3A
It should look like this once you’re finished setting up your Linux environment: https://milrd.org/wp-content/uploads/2022/06/LinuxTerminalOverview.png
Linux is a command-line based operating system. For our purposes Linux = Unix.
Let’s do a brief review of Linux commands on our AWS-hosted Linux instance in RStudio. This the language and structure of this tutorial is heavily borrowed from http://www.ee.surrey.ac.uk/Teaching/Unix/. Go to this website and read the “Introduction to the UNIX Operating System”. For our purposes, you can treat Unix and Linux as interchangeable.
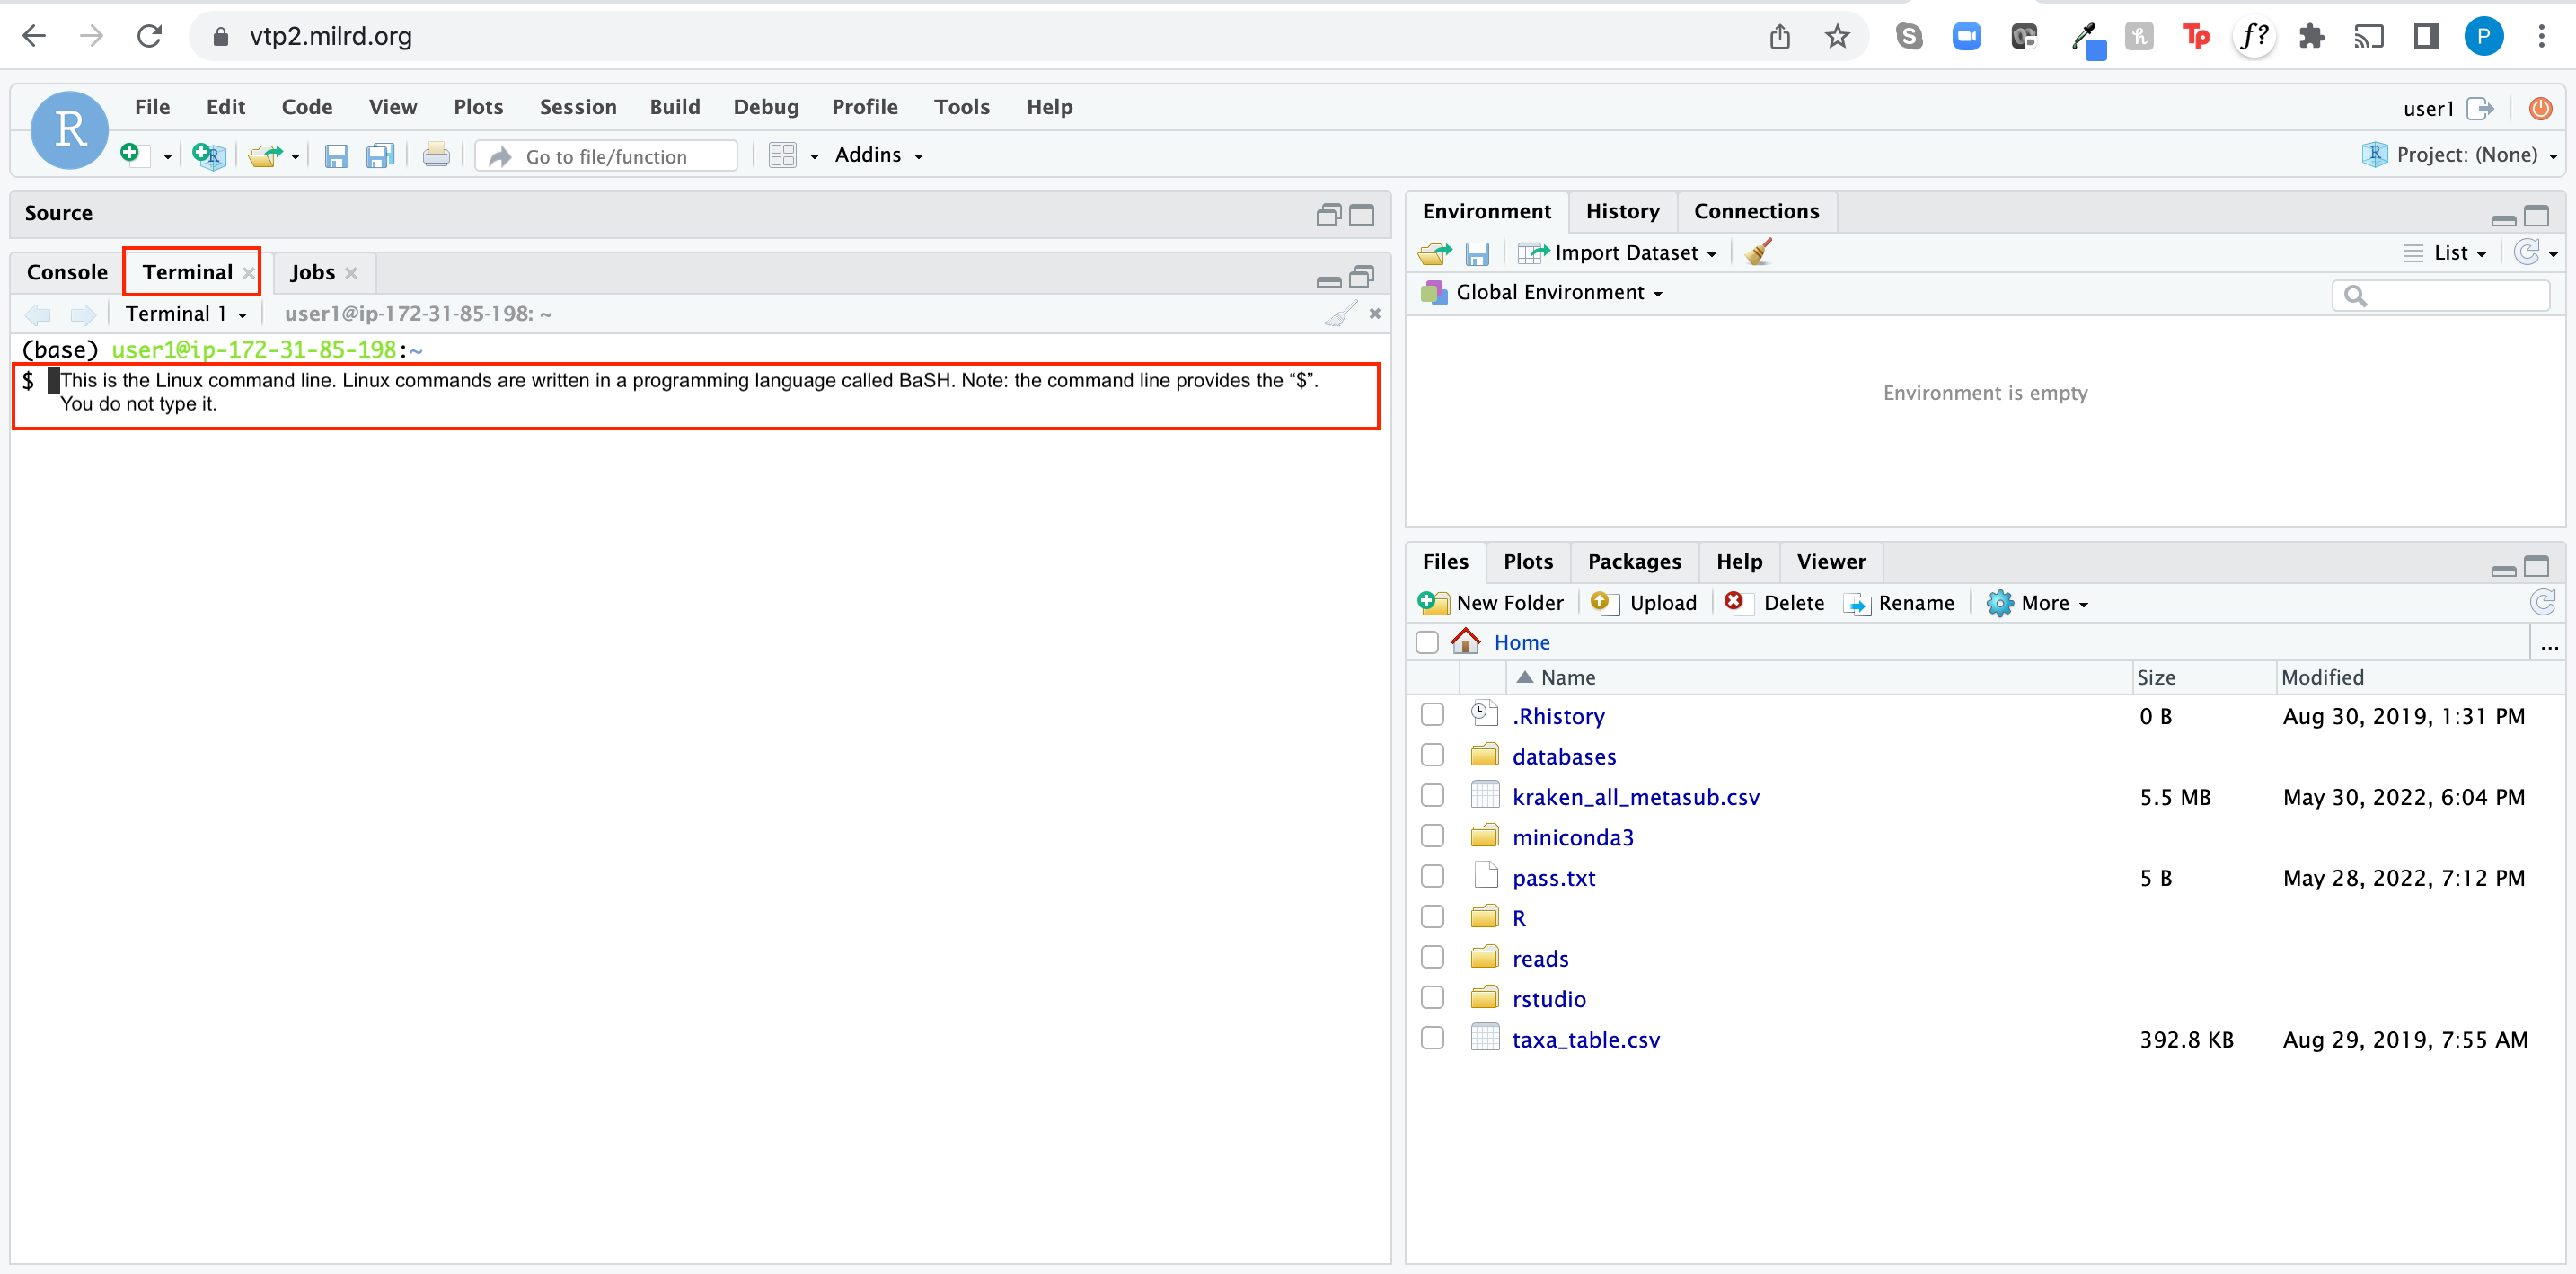
ls (list) When you first login, your current working directory is your home directory by default. Your home directory in every Linux system is denoted by the shorthand ~.
To find out what is in your home directory, type:
$ lsThe ls command ( lowercase L and lowercase S ) lists the contents of your current working directory.
You should see these Directories and files: R databases miniconda3 pass.txt reads rstudio taxa_table.csv
Note that the directories and files are colored differently.
ls does not cause all the files in your home directory to be listed—only those ones whose name does not begin with a dot (.). Files beginning with a dot (.) are known as hidden files and usually contain important program configuration information. They are hidden because you should not change them unless you are very familiar with Linux!!!
To list all files in your home directory including those whose names begin with a dot, type:
$ ls -aAs you likely guessed, the a in -a stands for all.
As you should now see, ls -a lists files that are normally hidden.
ls is an example of a command which can take options: -a is an example of an option. The options change the behaviour of the command. There are many online resources that tell you which options a particular command can take, and how each option modifies the behaviour of the command. We’ve posted a Linux command “Cheat Sheet” in the channel with Cody.
Making Directories
mkdir (make directory)
We will now make a subdirectory in your home directory to hold the files you will be creating and using in the course of this tutorial. To make a subdirectory calledunixstuff in your current working directory type:
$ mkdir unixstuffTo see the directory you have just created, type:
$ lsChanging to a different directory
cd (change directory)
The command cd directory means change the current working directory to ‘directory’. The current working directory may be thought of as the directory you are in, i.e. your current position in the file-system tree.
To change to the directory you have just made, type:
$ cd unixstuffType ls to see the contents (which should be empty)
Make another directory inside the unixstuff directory called backups
The directories . and ..
Still in the unixstuff directory, type:
$ ls -aAs you can see, in the unixstuff directory (and in all other directories), there are two special directories called (.) and (..)
The current directory (.) In UNIX, (.) means the current directory, so typing
$ cd .NOTE: there is a space between cd and the dot
means stay where you are (the unixstuff directory).
This may not seem very useful at first, but using (.) as the name of the current directory will save a lot of typing, as we shall see later in the tutorial.
The parent directory (..) (..) means the parent of the current directory, so typing
$ cd ..will take you one directory up the hierarchy (back to your home directory). Try it now.
Note: typing cd with no argument always returns you to your home directory. This is very useful if you are lost in the file system.
Pathnames pwd (print working directory) Pathnames (also called filepaths) enable you to work out where you are in relation to the whole file-system. For example, to find out the absolute pathname of your home-directory, type cd to get back to your home-directory and then type:
$ pwdThe full pathname will look something like this:
/home/user#which means that user# (your home directory) is in the sub-directory home (the group directory), which is in the top-level root directory called ” / ” .
Unix File structure
Use the commands cd, ls and pwd to explore the file system.
(Remember, if you get lost, type cd by itself to return to your home-directory)
More about home directories and pathnames Understanding pathnames First type cd to get back to your home-directory, then type:
$ ls unixstuffto list the conents of your unixstuff directory.
Now type:
$ ls backupsYou will get a message like this: backups: No such file or directory
The reason is, backups is not in your current working directory. To use a command on a file (or directory) not in the current working directory (the directory you are currently in), you must either cd to the correct directory, or specify its full pathname. To list the contents of your backups directory, you must type:
$ ls unixstuff/backups~ (your home directory)
Home directories can also be referred to by the tilde ~ character. It can be used to specify paths starting at your home directory. So typing
$ ls ~/unixstuffwill list the contents of your unixstuff directory, no matter where you currently are in the file system.
What do you think ls ~ list?
At this point, you have completed through Introduction and Tutorial One on http://www.ee.surrey.ac.uk/Teaching/Unix/. Continue with Tutorial Two (Copying Files, Moving Files, Removing Files and directories, Displaying the contents of a file on the screen, Searching the contents of a file). After those are complete, you can optionally complete Tutorials 3-8, but they are outside of the scope of the Linux skills you’ll need to complete the VTP.
Once you have finished all of the above exercises, please execute:
$ history > yourName_linux_work.txtyourName_linux_work.txt is a file that should contain all of the commands you’ve executed in your Linux terminal.
Checkpoint (CP) 1: Please take a few screenshots of your work up to this point and post them in a single post on the group Slack channel. In the same post, please upload the yourName_linux_work.txt file so we can review it.
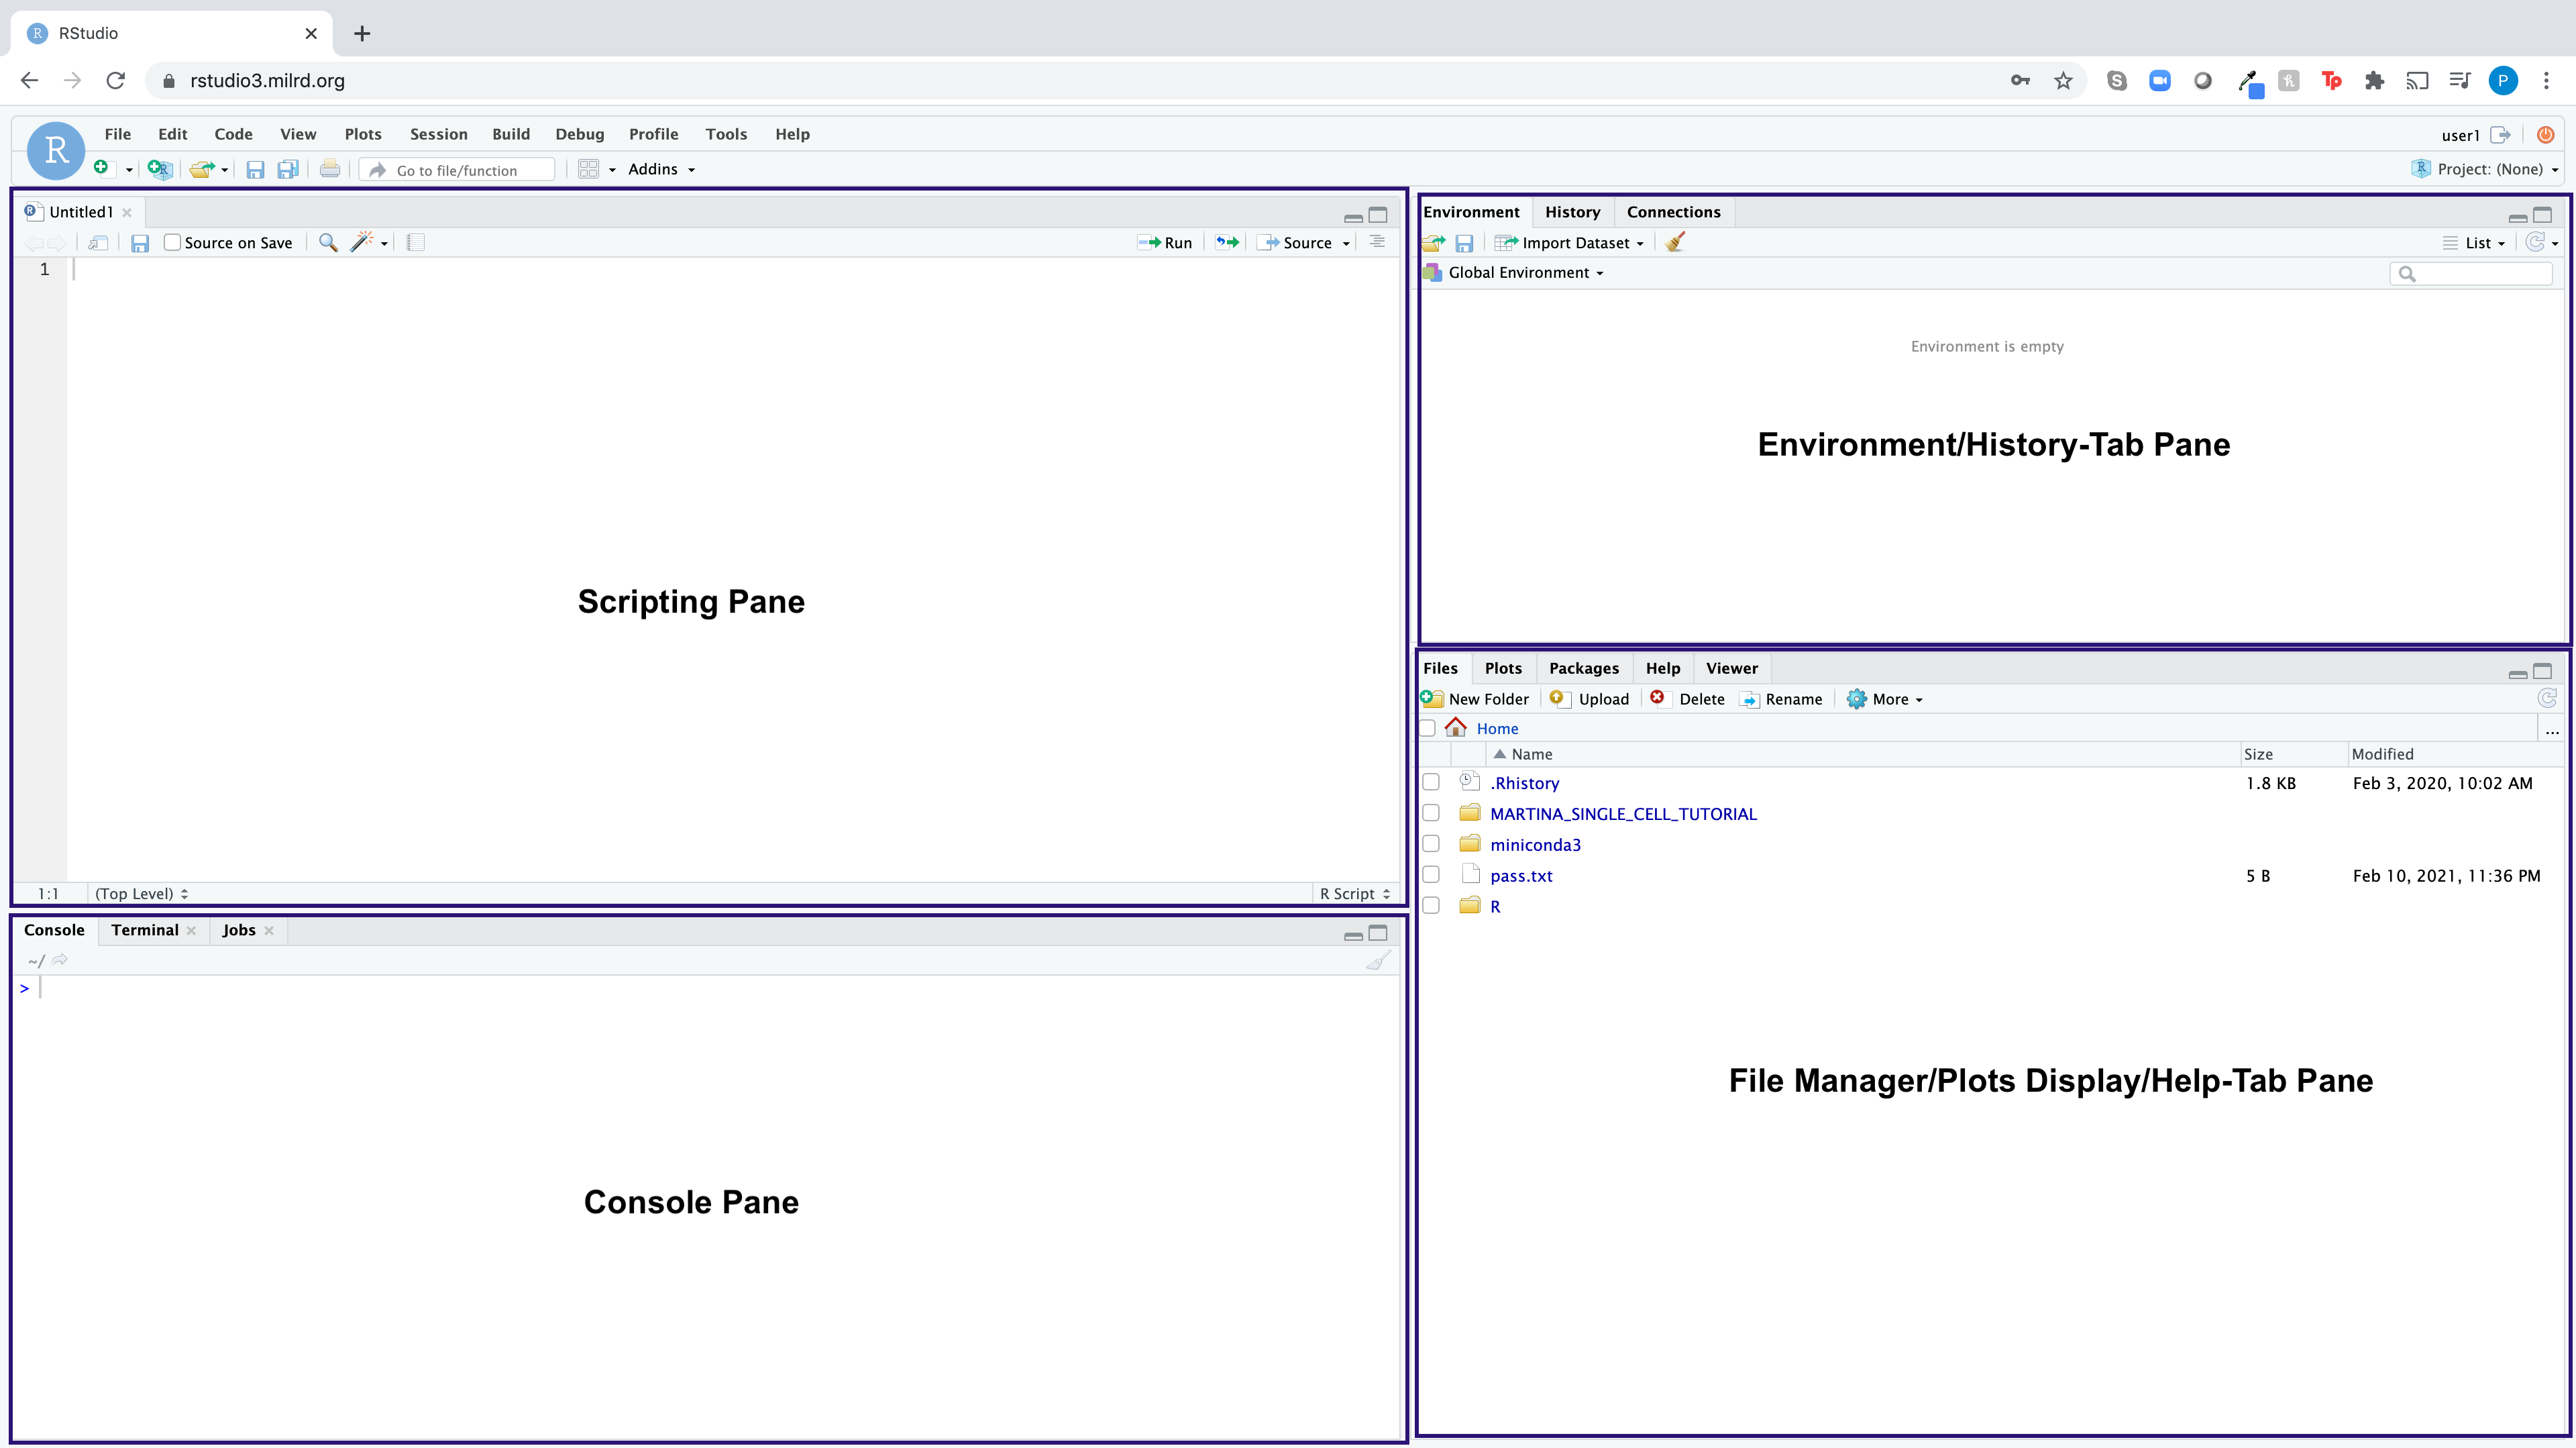
RStudio is an integrated development environment (IDE) for the R programming language, which basically means it brings the core components of R (Scripting Pane, Console, Environment Pane, File Manager/Plots/Help Pane) into a quadrant-based user interface for efficient use.
Login to your AWS-hosted RStudio instance using the URL, username, and password assigned to you in the Google Sheet. Please make sure the RStudio user interface dashboard looks as follows: Console Pane (Lower Left Quadrant), Scripting Pane (Upper Left Quadrant), File Manager/Plots Display/Help-Tab Pane (Lower Right Quadrant), Environment/History-Tab Pane (Upper Right Quadrant).Here is what that should look like: https://milrd.org/wp-content/uploads/2022/06/RStudio-Screenshot_Panes.png
Note the directories and files in the File Manager are the same as those in the home directory of your AWS instance, as accessed via the Terminal. This is because RStudio is installed on the same AWS instance you accessed via the Terminal.
In R, code is always executed via the Console, but you have the choice whether to execute that code in a Script (opened in the Scripting Pane) or directly in the Console. Unless you need to quicly execute a one-liner (e.g. setting a working directory using the setwd command), you’ll want to be writing your code in a script, highlighting it, and clicking Run to execute it in the console. This is because you can easily edit code in a script and re-run it. Once code is run in the Console it is not editable.
Execute the commands found on the landing page (and only the landing page) of this website in your RStudio instance (found in the grey boxes): http://www.r-tutor.com/r-introduction.
(Note: if you run the “> install.packages()” block, R will throw an error since you will not be specifying a specific package to install)
Execute the codes on the first webpage of the tutorial in the Console (as instructed by the website).
Take a screenshot showing this code successfully ran.
Next, clear your Console Pane and Environment Panes using the “brush” icons, re-enter the same codes in a script in the Scripting Pane (there is an empty script created for you called “Untitled1”), highlight the codes and click “Run”. The results should be the same as when executed in the Console, but you can now edit the script and re-run them as much as you’d like.
Checkpoint (CP) 2: In a single post on the group Slack channel, please upload your screenshot of your console showing the code ran properly and the R script file.